

Champions of Krynn - the way to victory:
(for more details on the history so far see the adventure journal)
Welcome, Hero, to the world of Krynn! The War of the Lance is over, and so is the terrible chaos that arised from Raistlins Majere’s, one of the heroes of the lance, struggle to become a god himself. The good forces have been victorious and you and your fellows wander the lands and arrive at a little outpost near the old city of Throtl, in a land that has before suffered the fist of Evil for a long time. Settlers and Knights are just beginning to rebuild what has been destroyed or spoiled by the Goddess Takhisis and her minions.
But Evil has not been destroyed. It has just been driven away into the shadows and is again planning and preparing the destruction of the noble Knighthood and the newfound order in the lands of Ansalon. That’s where you come into play. Bad omens and forebodings can be seen, evil forces begin again to infest the anyway battered people and their homeland. The Knighthood is aware of this, but their powers are weak in this remote area. They need valiant men and women to fight the rise of Evil - YOU...
Getting started:
The party: Here’s my suggestion how to build a successful group of heroes. My party consisted of:
- a human Knight of the Solamnia
- a dwarven Fighter
- an elven Cleric of Mishakal/Ranger
- a human Cleric of Paladine
- a half-elven Red Robe Mage/Thief
- an elven White Robe Mage
Why these?
Well, first of all: a Knight is essential! Without one the game can not be solved. For my Knight I chose the order of the Sword. This grants him the ability to cast a few clerical spells at higher levels, at the cost of a slower advancement in levels. But you’ll need his healing powers later...
One pure fighter has to be with your party to increase your ´firepower‘.
The Mishakal-Cleric/Ranger did an excellent job. Mishakal clerics have the best bonus spells granted by their goddess and, most important, they get an extra bonus when casting healing spells. This nearly doubles their efficiency in curing wounds of the party, and when you ever played one of these games and are as pissed as I from those rest-heal-rest-heal-orgies, you’ll be happy to have at least one of those guys in your party. The fact that he’s also a Ranger makes him quite a killer, too (especially when wearing a girdle of giant strength...).
My Cleric of Paladine did well, too. She was not that good at healing, but you need another cleric to have enough Hold Person spells ready and to wield the blunt magical weapons you find in the course of your adventures (such as the mace of disruption, which is very dangerous for all undead). Hold Person is the most beautiful invention in the whole game. You can paralyze even the mightiest warriors (not the higher Draconians, see later...) and after that kill them with one single tiny little dart. Really helpful...
A Red Robe and a White Robe Mage should both be part of your group, because in Champions of Krynn the spells and scrolls are divided for the different alignments. For example, a Red Mage can not read white scrolls. Furthermore they can’t cast all spells, but the others can be cast by the White Mages. To have the maximum magical power, one of each order is essential.
I combined my Red Mage with a Thief. This gave her the skill of backstabbing, at higher levels, a really powerful way of killing and better chances of lockpicking. One further important advantage is that you have a Mage who can wield a longsword and leather armour.
The Story:
(These are brief descriptions of the adventures - for more details see the maps. This section gives the story and the order in which the adventures have been done. For more informations see the ´Tips and Hints‘ section below. If you want to explore details for yourself, just stop reading at the heading ´Tips and Hints‘... Good hunting!)
We were wandering the lands of Eastern Ansalon and arrived in a small outpost near the now ruined city of Throtl. It was near this outpost when we were for the first time reminded that Evil was not dead, but sleeping and about to awake again.
We came just in time to rescue some settlers from an ambush of monsters. In the outpost itself we had to discover that even there the dark forces were at work. Shapeshifting Draconians had taken the role of the former Commander. Sir Karl, noble Knight, unveiled them and from that day took over the business of guiding the struggle against Evil. We knew at once that we could trust this man. He was indeed of highest spirit.
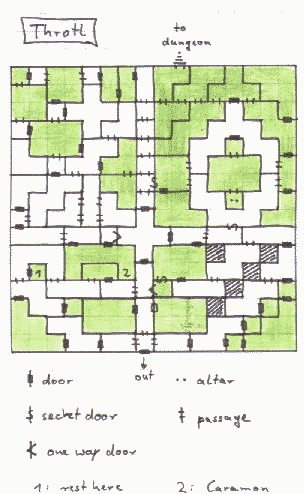
Rumors spread that Throtl was bustling with monsters, and Caramon himself, one of the Heroes of the Lance, had gone there to examine the activities. It seemed that he was captured, and so Sir Karl sent us there to search for him. We were unexperienced then, but what else could we do? Caramon in the hands of Hobgoblins? Or worse... dead...?
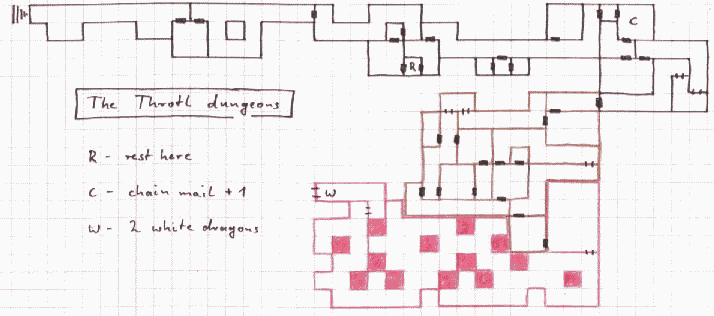
The city was full of Hobgoblins and a few Draconians were there, too. This was terrible. We found evidence that the evil forces have begun trying to corrupt good dragon eggs once again to create new Draconians. We found Caramon, alive, but battered and chained, in the south central part of the city. He left at once to organize the defence against Darkness, and after a brief rest and training in the outpost we returned to Throtl to search the dungeons below for the good dragon eggs which, so we were told, were stored down there for foul purpose. Deep in the dungeon we found them, but they were not unguarded. Two White Dragons attacked us, and we had quite a tough fight overthrowing them. But with the help of the true gods we won, and were able to save a lot of good dragon eggs from a horrible fate.
The town of Jelek was our next destination. Sir Karl wanted us to investigate strange tidings from there, so we set travelled there to look if everything is in order.
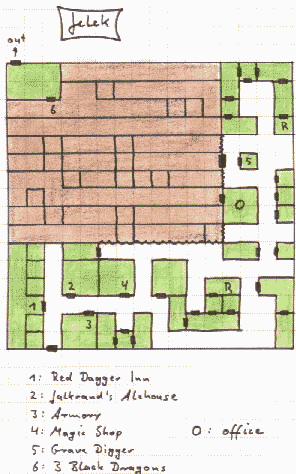
It was not. We had to realize that the town was heavily guarded by soldiers and a certain Sir Lebaum was in charge. The strange thing was that no one seemed to know this man... Our guide, a man named Skyla, who was assigned to us as a guide and guard, was a really foul guy. He tried to lure us into ambushes several times, until a woman named Myrsella helped us find some friendly people, where we were able to rest and hide from the evil soldiers walking the streets of Jelek.
A huge graveyard in the NW section of Jelek seemed to be the root of Evil. We knew that Sir Lebaum had moved his office into one of the buildings on the cementary, so we took a look. It was full of undead creatures, and we found evidence that an army of undead was in preparation. We also learned that a creature named Myrtani, a Draconian, seemed to be the head of the new uprise of Darkness. In the far NW corner of the graveyard was a building guarded by 3 Black Dragons! Another hard battle and they were finally defeated. After that Jelek was safer. One very important fact was that obviously a real Dragonlance was in the hands of Myrtani. This powerful weapon had to be recovered!
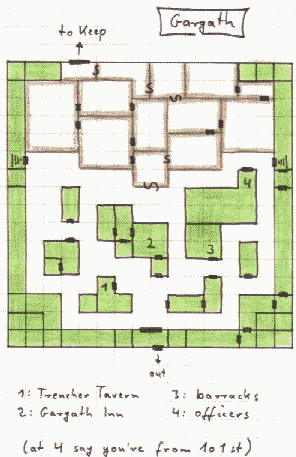
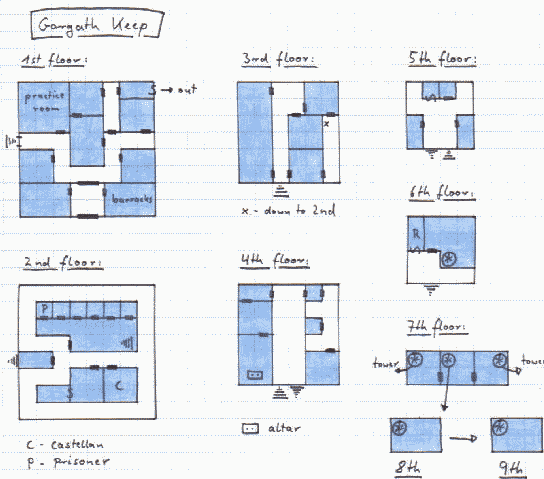
After training we followed some clues to Gargath. Sir Karl knew that the castellan of Gargath Keep had secured the Dragonlance. There, too, Evil had spread its wings and took over the town. Draconians had overrun the weak garrison at night and enslaved the people. To guard the Keep they had built a large wooden building complex in the north part of the city. We met a stranger when we entered Gargath who was familiar to Sir Karl. He helped us and told us how to get into the wooden structure and how to enter Gargath Keep. This was hard, though. Large forces of experienced fighters, Mages and Clerics guarded the city and the interior of the wooden building. We had to retrieve several times to the Inn for rest and healing before we were ready to storm the Keep (the entrance is in the far NW corner of the city. A map of the Keep helped a great deal. We acquired it some time earlier in our adventures. In the prison tract on the 2nd floor we found the former castellan of Gargath Keep. He told us where to look for the Dragonlance. The Draconians were obviously turning the Keep upside down in search for the Lance.
We had to fight our way up to the sixth floor, but the treasure room where the Lance was kept was already looted. We were minutes too late! Some good magical weapons were forgotten, though, so we could take them to increase our power. The treasure room was also a place where we could rest. And this was important, because Myrtani and his minions were still in the Keep. We chased after him higher into the tower, on the way chopping down many Draconian guards. At the top we engaged Myrtani himself, but he escaped, Dragonlance in hand, by delaying us - with the help of several Black Dragons. While we fought for our lives he took the Lance away to Sanction.
Frustrated, but with much information, we returned to the outpost near Gargath. There, the commander told us about the tomb of Sir Dargaard, a revered Knight of old, where we might gain some mighty weapons and armour for the purpose of Good.
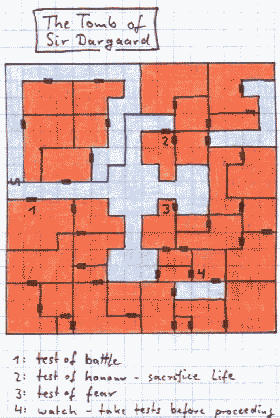
We travelled there and had to stand several tests (only our Knight could pass most of them) prepared by the spirits of Sir Dargaard and his brothers in arms, who were buried in this huge tomb (see maps for details). After we passed all of the tests we were allowed to enter the section where the Knights were buried. The Ghost of Sir Dargaard deemed us worthy and awarded us with weapons of Magic and the finest Solamnic Plate Armour. (there were six... I took them all and carried them all the way to the end of the adventure - only Knights can wear them - I dunno if they serve a purpose some other time in the game...)
After obtaining the magical items we finally discovered what it was that had sneaked after us all the time in the tomb - Draconians! Through the Draconian corpses we found we already knew that they had been trying to lay their claws on the treasure stored here, and now, after Sir Dargaard and his Knights found rest after all, they deemed us an easier target and attacked. But they underestimated our strength and we killed the foul breed in the name of this noble Knight who had just found peace.
When we arrived home at the outpost near Throtl, we met Maya, the beautiful and mysterious woman who we knew was often a target for gossip in the local taverns because of her relationship with Sir Karl.
She anxiously told us that the outpost had been attacked and Sir Karl been taken prisoner. It seemed that he was brought to ruined Neraka, once a center of service to the Dark Queen Takhisis. It didn’t need much pleading of Maya to convince us to follow her to this evil place and try to rescue her beloved Knight. Such a man would not fall into the hands of Evil if we could prevent it.
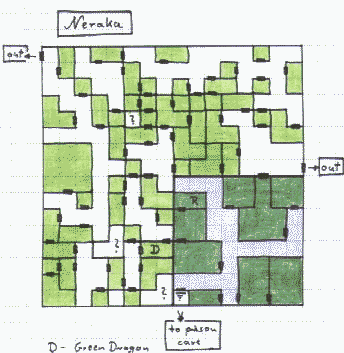
So we set off and entered Neraka. The city was full of beasts and Draconians playing a pervert man-hunting game with their prisoners. To our great surprise Maya revealed herself as a Silver Dragon! She fought with us side by side in her dragon form all the foul creatures that infested the place. One building in the SW section even held a Green Dragon. We fought our way through the town and got into the level section of the prison complex (SE area). After slaying many guards we found Sir Karl at the stairs to the prison dungeon, dying. He had escaped from his cell, but his wounds were too severe. He died in Maya’s arms, begging us to free the other prisoners below. Maya got furious and flew away, after Myrtani, to avenge the death of her beloved.
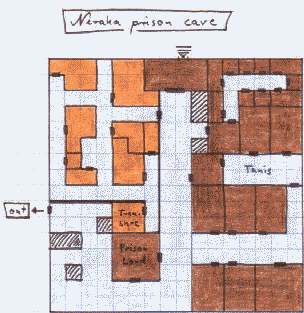
We went down without her and the second great surprise waited for us... Tanis, another one of the heroic Company of the Lance was in there, just freeing the prisoners. He told us to free the others, distract the prison guards and get out of there. We did as he said, but stumbled into the room of the Prison Lord and his subjects. This was a tough thing, because he was quite experienced, and his men were numerous. Though, with luck and craft we defeated them and took his magical items.
It was good that we rested in this room before proceeding, because the way to the SW exit was blocked by Green Dragons which would have killed us easily if we hadn’t rested before. By ending their lives and examining the SW exit we were able to gain a lot of Good Dragon eggs kept by the Greens. We did not leave without freeing the tortured hostages in the NW area of the prison dungeon. This noble deed gained us a lot of experience.
Our next journey took us to an Ogre base roughly east of Gargath. We had heard of Ogre renegades before, who would possibly join our forces against Myrtani, but had to postpone this because of the more pressing issue of Sir Karl.
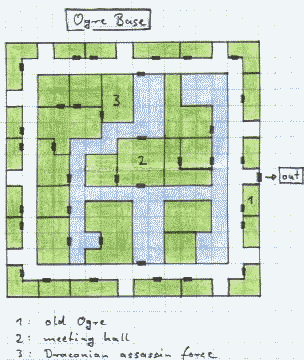
An old Ogre in the building just to the left of the entrance told us about this place. The Ogres were split into two groups, and the ones loyal to Myrtani were planning to assassinate the leader Gravnak, who wanted to join us. I don’t know why, but we trusted this Ogre and went directly to the meeting hall in the center of the Ogre fort. Not a second too late... Draconian assassins were just pouring in. We joined forces with Gravnak. He, together with his loyal fellows and our help, was able to strike down the rebellious mutineers. His authority regained, he promised to help us later in an assault on Kernen, Myrtani’s hiding place. In this final battle he was a very useful ally, but before that we had yet much more adventures to stand...
One of the adventures waited for us in the southern outpost, which the new commander told us to inspect. A messenger sent down there had not returned.
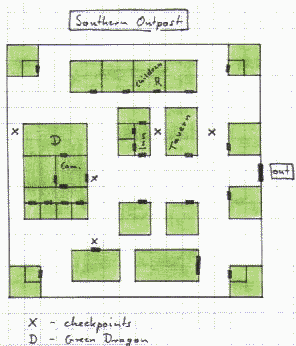
Our conversation with the commander of the Southern outpost when we arrived convinced us that something was fishy here. The entire north area was heavily guarded and the soldiers were somehow strange and unfriendly. A ragged man sneaked upon us and whispered that we should meet him later. He told us that Draconians had taken over the outpost and that the commandant was not a man, but a Sivak Draconian taking his shape. He told us to free the imprisoned real guards of the outpost and he knew a secret entrance into the main barracks. We went there, but the prisoners didn’t want to rise up, because their women and children were kept as hostages somewhere in the northern area. So we chopped our way through one of the checkpionts blocking the way north (there were Draconians in the shape of men among the soldiers) and found the children. Then we went back and freed the imprisoned men. They took care of the occupants outside and left the commander and his minions to us. Him, a Draconian, as expected, we defeated without much trouble, but his Green Dragon ´pet‘ in the next room was a test of our skills. But we made it and with the death of the Dragon the outpost was free again.
It was time to close in on Myrtani and his sinister machinations. We travelled to Sanction.
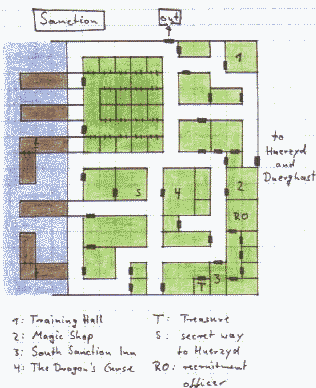
Once we arrived, we had to swallow hard. This city was a rat’s nest. Full of thieves, minotaurs and evil warriors. Only after catching several pickpockets in flagranti as they tried to steal money from us, our reputation among them seemed to grow and we were left alone. Besides, they also were a good source of information. We learned that a thieves guild was located in the SE area of Sanction. This guild house we visited briefly. We chopped down several fighters there and were awarded with the thieves‘ treasure, including some magical items, which we took as a toll for the offense of picking our pockets.
But the thieves were the minor threat... Proclamations read that here in Sanction forces for Myrtani were being recruited, openly and for everyone’s eyes to see. Also, the many Minotaurs that wandered the city had a strong grip on the entire western section. Evil really was so mighty here that they not even tried to hide themselves.
First we cared for the recruiting officer, whom we found in one of the rooms in the South Sanction Inn. After chopping down this foul maggot and his men we learned something that shocked us: from papers we found we had to discover that we were manipulated, lured and used as pawns by cleverly deployed hints and clues... brought to us by Myrtani’s subjects. Our quest for the Dragonlance was only a distraction. The main force of the Solamnic Knights was entirely dependent on the information we gathered and was so on the brink of being lured into a well-prepared ambush here in Sanction. This Sir Lebaum was part of the plan. He was in fact a Death Knight, a very powerful and black-hearted restless soul of a former Solamnic Knight. He was preparing an army of undead creatures that would serve as the hammer in blowing the unknowing Army of Good on to the anvil of Myrtani’s main force. At last we knew what all the tidings about looted graveyards really meant...
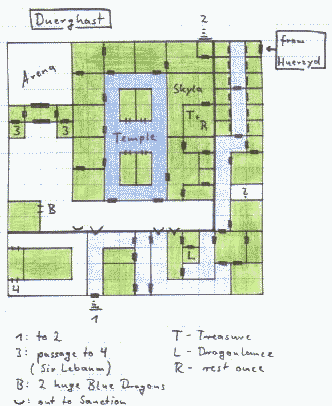
Things were on the edge. But now, as we knew their plan, it depended on us alone to warn our allies and prevent Sir Lebaum from raising the dead. For this we had to enter the ancient and now forbidden ruins of the two temple districts near the town: Huerzyd and Duerghast. A mysterious woman helped us in this time of greatest need. She told us that the Dragonlance could still be retrieved (it was stored in a secret room in Duerghast) and she also knew a secret entrance into Huerzyd (the main entrance in the W of Sanction was heavily guarded by Draconians.
She gave us an amulet, which would serve as a sign of friendship for the strange Shadow People who seemingly lived in those old areas. We have heard of them before, but that they really existed we didn’t believe. So they were no childens‘ tales...
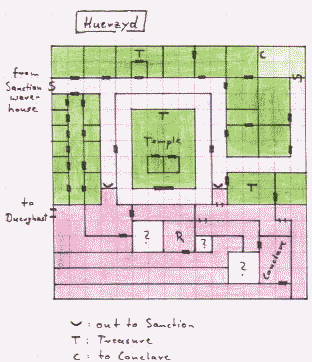
With this amulet we entered the deserted ruins of ancient Huerzyd and were able to contact this furtive people. We were brought to their conclave and they advised us to proceed to Duerghast, where Sir Lebaum was preparing the final blow, engage him and spoil his plans. And so we did.
Through a secret entrance only the Shadow People knew we entered Duerghast, where we were able to finally lay our hands on the most precious of weapon: the Dragonlance! In addition to the many enemy fighters and Draconians we later met an old `friend‘: Skyla. The fine guy who had once tried to get rid of us by ambushing us in the streets of Jelek. Revenge is sweet... It was a pleasure to beat the crap out of him (oops... excuse me...). His dead body held papers that showed us the full extend of Myrtani’s ambush. Masses of Good Dragon eggs were ready to be transformed into Draconians, as the final blow for the Forces of Solamnia. This had to be prevented at any price!
In the open section in the SW of Duerghast some huge Blue Dragons guarded the Good Dragon eggs. With luck and craft we were victorious and could secure the eggs. The Dragonlance really was a weapon of Power. One single blow instantaneously slew a Dragon! One part of the plan was smashed.
So far, so good... But the Death Knight remained a threat. We found him and his minions in one of the towers of the arena in the NW corner. What a terrible foe! Immune to Magic, striking fear upon our souls and able to summon undead creatures at will, only enchanted steel could bite him. The gods must have been at our side, for we managed to send him to the Abyss. Thank Paladine! Without the laeding will of Sir Lebaum the Army of Undead was no threat anymore...
But we could not lay back and rest, because messengers were escaping to warn Myrtani. We rushed after them out to the courtyard to see that a battle in the sky was raging. Good and evil Dragons were fighting above us, the clash of the Armies had begun. For us waited a bunch of Red Dragons, to delay us and give the messengers time to escape to Kernen. They mounted a Red and flew away. We had to kill some Dragons, and just in time, the cavalry, a huge Golden Dragon, arrived. We mounted it and chased after the the Reds carrying the messengers. The long time of the flight to Kernen gave us time for an urgently needed rest to tend our wounds and memorize new spells.
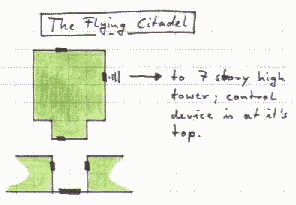
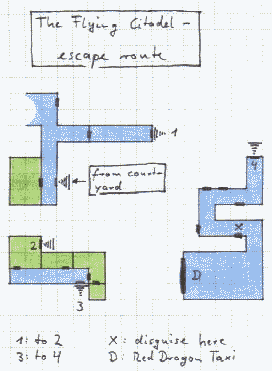
Another surprise... Tasselhoff Burrfoot, the kender hero, joined us on the back of another Dragon. He led us to Kernen, where we had to see a gruesome sight: Two Flying Citadels, the invincible fortresses ripped from the ground by arcane magic, drifted towards us to block our way. Tasselhoff was fearless, as always, and steered us directly onto the courtyard of one of them. He had flown one of these Citadels back during the War of the Lance and hoped to capture it. We slew many Draconians on our way up to the main tower, where the control room was located. Tasselhoff took control and in his unmistakable and sympathetic thoughtlessness directed the Citadel right into the other, ramming both of them to the ground. We were battered quite a bit by the impact and had to escape through the cellar complex of the Citadel. Wandering in the dungeon, looking for a way to escape the slowly sinking building, we chanced to stumble over some enemy fighters. We slew them and took their uniforms as a disguise. This was a really good move, because this way we caught a hike down from the nearly crushed structure on the back of a Red Dragon (!) waiting at the exit.
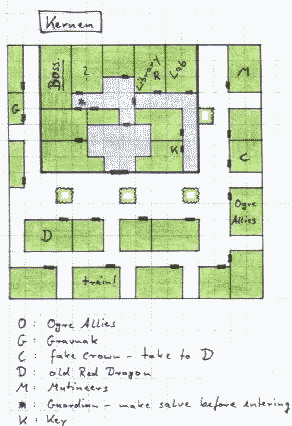
It landed us safely in the middle of Kernen, where we could walk around safely because of our disguise. We took advantage of this situation by rising a lot of confusion among the enemy, several times even letting them jump each others‘ throats! So the defense of Myrtani’s fortress in the north section of Kernen was considerably weakened and we could easily storm the gates that would lead us to the final battle against Myrtani himself. Gravnak, the renegade Ogre chief, deemed a loyal ally here. We had found him and his Ogre warriors in the east of the city before and gave us useful hints, once inside, how to proceed to the heart of the fortress. Many a Red Dragon (and some of the terrible Aurak Draconians) we had to slay before, at last, we stood before the head of this new uprise of Darkness - Myrtani. He was an Aurak, a very huge and powerful one and he had many guards with him. And, even worse, he showed us Maya, the Silver Dragon woman, chained to the wall behind him. She had been captured attempting to avenge the death of Sir Karl.
Myrtani was a formidable foe, but the devastating storm of Magic we let loose on him and his minions was too much, even for him. His last breath taken, he exploded into nothingness. Maya was released, and with their leader gone and all their plans prevented, the routing of the remaining forces of Evil was a long but easy task for the Army of the noble Knights...
So ends the tale of the Champions of Krynn, and so it will be told many a time. And many a song will be sung about the small group of heroes who believed in the powers of Good and prevented Evil from rising and devastating the lands of Ansalon once more.
Tips and Hints:
This section contains clearer advice how to achieve best results and where to find treasure and weapons. If you want to find out yourself, stop reading here.
Resting: Time is unimportant in this game. That means you can rest whenever possible without letting anyone escape or get overrun by events. There are several places where you can rest even in the middle of the enemy’s strongholds. It’s always good to save before resting, though... In addition to the places of which you were told you can rest, there are several more. They are marked in the maps I‘ve drawn.
You have to rest as often as possible, or the numerous monsters beat the crap out of you. If it’s not possible on some of the maps, feel free to leave, go to an outpost, rest there and go back to ´work‘ again.
Taverns: Go and have a drink. You can record about 3 or 4 tavern tales, one for each drink. Just don’t drink Whisky. It’s not so good for your head. Mostly because your heads will be split by ruffians if you’re in unfriendly corners of the land...
Alternative solutions: The adventure journal contains much more than I have seen in the course of this game. There may be a number of other ways to achieve the goal of defeating Myrtani and many further maps to scout. Also, I’ve read (after solving, of course...) that, for instance, Gravnak, the Ogre Boss, must not be an ally of the good guys. Or Angar, the man in the Southern Outpost... If these journal entries are for real (represent alternative storylines) or if they’re made to confuse nosy players who think they can do better by reading all of the entries before, I do not know. If anyone finds out, please let me know...
The various adventures:
Here are my collected hints and clues for best results concerning the various places your adventurers stumble into. This collection is NOT complete. There are certainly much more treasures to gain. Explore yourself...
Throtl: Not much to say about this one. The room where the evil cleric houses together with his 6 Skeletons is good for a rest. The dungeon below is really tough for inexperienced guys, but with speed (without the search option engaged) you’ll make it without too much random encounters. Use every spell you have on the two White Dragons. They’re the last enemies here. After that you can go home and rest.
(A general note:) Search is only of use in rooms. I wandered the dungeons with search engaged and the many encounters really drove me mad... In not a single corridor in the whole game I found something of interest that I wouldn’t have found without searching...
Jelek: Skyla will lead you into one ambush after another. You may fight one or two of these battles, but they’re hard... If you’re tired of them, just run away. The main XP you can get here is from the 3 Black Dragons on the graveyard... After Skyla led you to his so-called friend in the south central part of Jelek, he will unveil himself as a bad guy and after that monsters and evil fighters attack without warning. Trust Myrsellia and rest. After that go to the graveyard.
Don’t waste time searching the whole graveyard. The only interesting things are in the office just south of the entrance and in the NW corner, where the Blacks are. If you waste too much time on the cementary, bunches of Ghouls and Ghasts will attack. They’re killers (at least for you green guys...) and if turned, you even don’t get experience for them... Walk in, take the papers from the office, hack the Blacks in nice slices, take the treasure and leave.
Gargath: Tough... A lot of good fighters, magic-users and Draconians there. Rest often in the Gargath Inn. It’s safe. If you stumble into the officers‘ barracks in the eastern area, tell them that you’re from the 101st (...some tavern tale...) and you’ll stay out of trouble.
For the Keep and the wooden structure that shields its entrance you should take some time. There are some hard battles, but a lot of XP and useful items, especially in the keep itself. Take your time to rest in the secret room where the Dragonlance was supposed to be kept. You’ll need all your powers up in the tower. It may be good to return there to rest even before you engage Myrtani at the top of the tower. His black pets make an edgy fight...
If I remember correctly, there’s a Sword +4 vs Reptiles somewhere in the Keep. This one is very useful. Don’t miss it...
The Tomb of Sir Dargaard: You have to pass three tests before the Noble Spirit gives you an audience. Furthermore you should not be greedy and leave the heaps of treasure in the NW part alone.
The Test of Battle is done by fighting through some of the rooms in the SW section. Nothing too demanding, but not easy.
The Test of Fear is no problem. Just let your Knight step through all the rings of fire. He’ll never die, just go k.o. After the test is complete, he’ll be healed.
The Test of Honour is tricky. Somehow these quixotic Knight guys think money is no good to sacrifice. If you sacrifice items, you’ll be stripped of most of your magical trinkets for ever. Just sacrifice your life! Knights really like that sort of stuff. Your Knight will fall down to 0 HP. Cast one cure light wounds spell on him and let him take the rest of the test. He’ll be healed again after the test.
Neraka: Maya is with you. Don’t care for her healing. She does it on her own after every fight. Just see that she is not slain during one of the battles. There’s not much of interest up in town, except the Green Dragon behind the door with the sign: ´Exit to freedom´.
The SE corner of the map holds the fortified prison complex. You can rest in the commander’s office, but save the game before. Down in the dungeon there’s a lot of trouble. Take the time to search the area. After freeing the prisoners in the SE, meet Tanis again in the W corner of the corridor that holds the southern prison cells. After that slay the Prison Lord and rest in his office (take his weapons - you won’t regret it...), for maximum power is needed to kill the Green Dragonsin the SW.
Make sure to leave through the SW exit. You’ll find some Good Dragon eggs there.
Ogre Base: You can have it the easy way... or the hard way. The easy way is to take a look into the first building to the left of the base’s entrance and trust the old Ogre who sits there. After that take the S entrance into the central structure, walk just straight on into the meeting hall at the end of the corridor, tell Gravnak everything and fight at his side.
The hard way... I tried to fight my way through the rest of the rooms before telling Gravnak. This is a challenge. The Ogres are not really a problem, but in one room in the north a bunch of Draconian assassins waits (about 30, including several Sivaks and an Aurak!). This was too hard for my party. I chose to be lazy and took the easy way. I didn’t regret it...
Southern Outpost: Don’t mess up with the guards too fast. Wander around, keep your heads down, leave closed doors closed and wait until Angar adresses you. He’ll then give you the map you need to enter the prison tract.
After freeing the children save and rest in the house where they were kept. Free the prisoners and kill everything that moves in the main building. End of quest.
Sanction: Some nice tricks how to get through Sanction without too much trouble...
- the thieves‘ guild can easily be overthrown when you know the secret sign. You get it from one of the pickpockets you catch in the streets. If you say it after entering the guild house, the thieves will scatter and only the few fighters will remain to stand against you. The treasure in the back room of the guild house is really worth the fight.
- you will find out that the entrance to the ancient district of Duerghast is heavily guarded. Do not try to fight through - the bridge will collapse and you haven’t won anything.
- Huarzyd is different. Maybe it’s a bug in the game, but when you enter it before you’ve slain the recruiting officer in the inn, you can explore the area unbothered by Draconians, get the treasure and scrolls, identify and make use of them. This leaves you in the pleasant situation that you don’t have to waste time, hit points and spells fighting heaps of Draconians. You can go straight on to the NE corner, where the secret room is that takes you to the Shadow People.
- the recruiting officer: Before you’ve killed him, nothing special happens. After that you will be drawn to the docks by cries for help. That’s the mysterious lady who will help you contact the shadow people. You have to split some Minotaurs‘ heads to free her, but these monsters are sissies, if you ask me. For their size they hit for surprisingly low damage. After you’ve freed her, Huarzyd will be full of Draconians and the Shadow People are there, too.
Huarzyd, after meeting the Shadow People: Don’t waste time. There’s nothing to find in the corridors. If you nose along for too long (e.g. by having the search option activated), you’ll have to fight off those naughty Mobats. You’ll get the map to the Dragonlance plus some nice items in the bigger room in the W of the Shadow People area.
besides... If I remember correctly, the conclave of the SP spoke about a door to the south, where you can rest. I didn’t find any... But in the square room in the center of the SP area (see maps) was a good place to rest. It’s door lied to the north, but... if it works... nevermind...
(...general note...: from now on you won’t have the chance to return to any shop to identify the magical items you obtain. You’ll have to find out by trial and error. Save Game and walk into a fight for different wands. Weapons can be identified by observing the effect they show on your character screen. There are some nice wands and items of protection which would be inexcusably wasted if not used...)
Duerghast: Only one thing: After gaining the Dragonlance and killing Skyla check your remaining strength. If you could take just one more fight with some champions and a few Draconians, go to the room complex south of Skyla’s room and slay the fighters who try to burn papers there. You’ll get precious information there. The reason for this is: if you enter the treasure room behind Skyla once, you may rest for any amount of time you need, but once you leave, you can not enter this safe place again. And you need all your strength for the battles to come... 2 huge Blue Dragons, Sir Lebaum (the Death Knight) and some Reds in the courtyard. So, after resting, hurry down the open courtyard to the southwest, where the Blues guard the Good Dragon eggs and hurry north into one of the arena towers to find the gate to Sir Lebaum there. Hurry because you can’t afford to risk a chance meeting with the numerous wandering monster gangs. Save often.
After defeating the Reds in the courtyard, don’t hesitate to jump the Golden Dragon. You’ll get the opportunity to rest to full healing while travelling to Kernen. Also, you have the chance to train for highher levels in Kernen, just before the eyes of Myrtani. So, don’t worry about that...
The Flying Citadel: There’s no need anymore to search every corner of this crappy building, because the end is already near. Just follow Tasselhoff up to the tower, let him do his crash drive and flee as fast as possible down every staircase you find. Otherwise you’ll have to fight many battles that only delay you at this stage of the game. Just tear to pieces the fighters whom you overhear arguing and take their clothes.
Kernen: Welcome to the final quest! First of all, there’s a chance to train in the middle 3*2 building at the south wall of the city. And here’s how you can cause the most beautiful confusion among Myrtani’s army:
- you’re disguised. Be nice to everyone and no one will hurt you.
- you’ll meet Ogres. They’re Gravnak’s bunch. They’re okay. Gravnak himself is in one of the small structures in the northwest
- some of the barracks are full of Draconians. If you howl with the wolves, you can start fires there to distract them.
- you can rest one or two times in any of the buildings, until Tasselhoff urges you forward.
- this old Red Dragon in one of the western buildings will do quite nice things if you bring him the fake crown which can be found in one of the eastern houses.
- in the far northeastern corner you’ll find some mutineers. Encourage them to rise against Myrtani. They’ll thank you with killing some more of the castle guards.
After all this it should be easy to defeat the few remaining guards at the castle gates. Once inside, Gravnak will tell you what to do. There are some quite challenging battles to fight before you get to Myrtani (including several Auraks and 5 smaller Red Dragons). I rested in the library. It worked. Save before resting!
That’s it... You’ve made it through the game. Congratulations for your new title: CHAMPIONS OF KRYNN... I hope you enjoyed your quest.
As I said before: This walkthrough does not contain everything you could do in this land. I’ll be happy to hear of you when you have suggestions on alternative solutions and additional maps to complete my notes. Feel free to contact me under cerebus@uni-muenster.de for questions and suggestions. I’ll be glad to be of help.
So long,
Mark
